This is the Rive workflow end to end, as it stands in May 2026. The runtime is mature, bundle budgets are tighter than they used to be, and the production patterns have settled. If you want the strategic case for mascots, that lives in a separate piece — this one is the build guide.
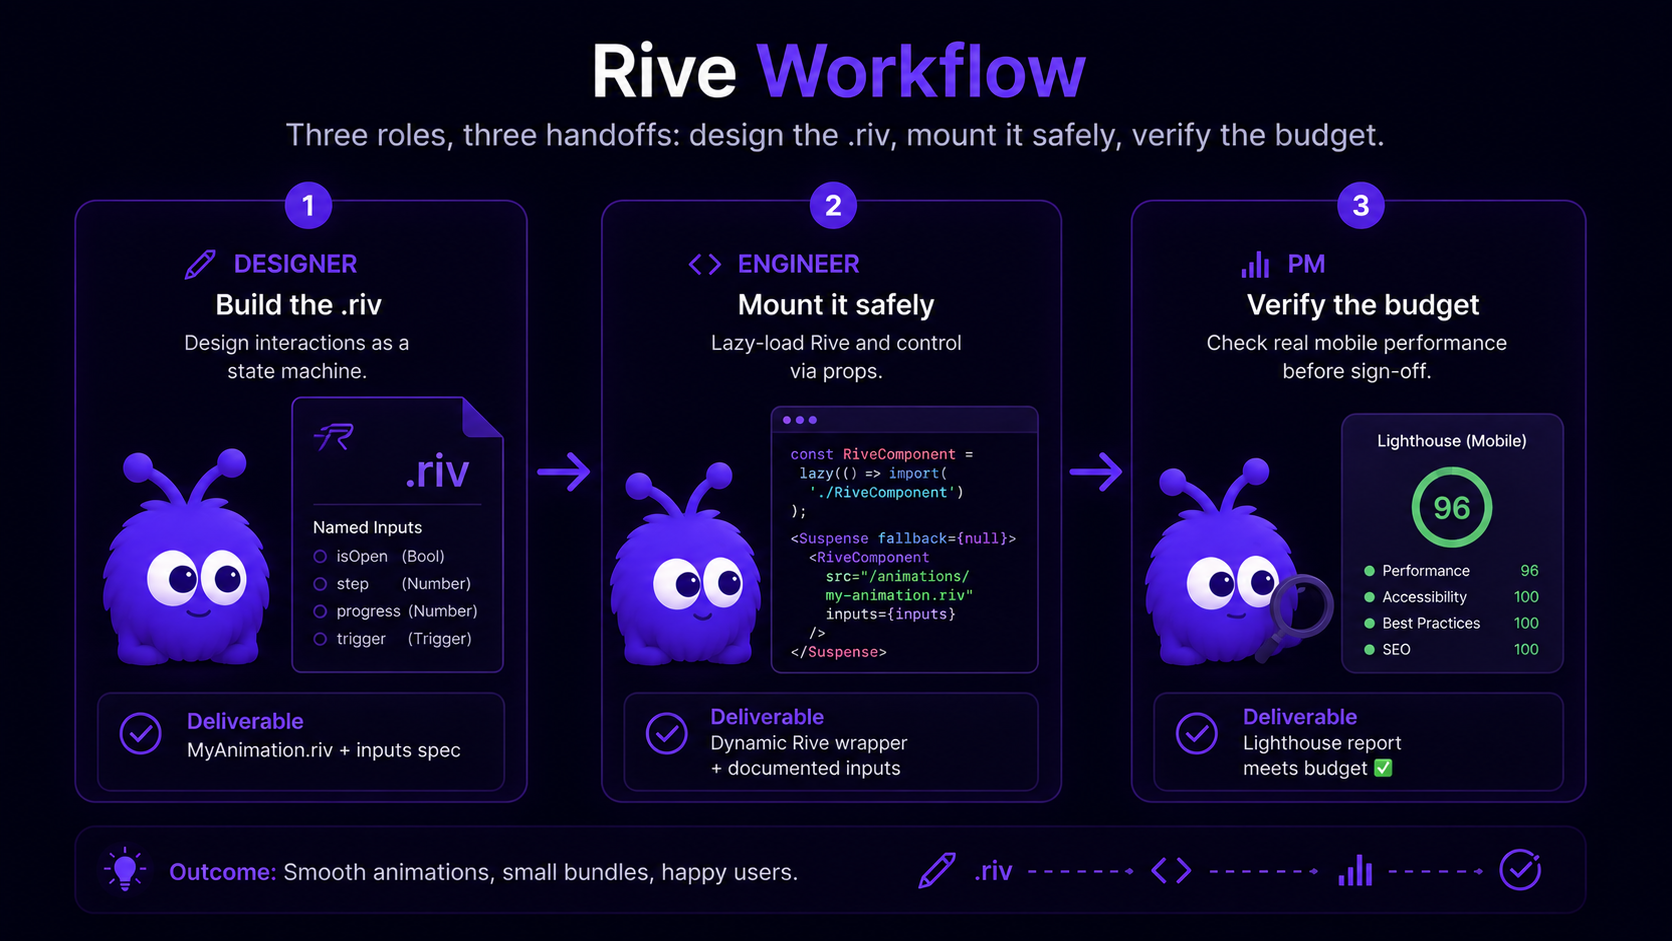
It is written for a small product team: one designer, one engineer, one PM, building an animated mascot from scratch. Each phase below is mostly one person's job, and the handoffs between them are where things tend to break.
What does the designer's side of a Rive workflow look like?
The designer's deliverable is a .riv file with three things: an artboard, a state machine, and a small set of named inputs the engineer can drive.
Artboard setup. A Rive artboard is the canvas the character lives on. The two design decisions: aspect ratio (square for chat-widget mascots; portrait for in-product companions) and pixel size (match the maximum render size in the app — 256x256 is enough for most chat surfaces). The artboard pixel size does not bloat file size as long as the design is vector — but it does set a cap on render quality.
Timeline animations. Each named animation is a timeline of keyframes. The standard mascot timeline set is idle (looping, 2-4 seconds, subtle motion), attentive (looping, head turn or perked posture), speaking (looping, mouth motion), celebrating (one-shot, 1-2 seconds). Building these as timeline animations first — before the state machine — lets the designer iterate on the motion language without state-graph complexity.
State machine. The state machine connects timelines via inputs. The Rive editor exposes a graph view: each state is a node referencing a timeline; each transition is an edge with a condition. The standard mascot graph has idle as the entry state, attentive reached when an isHovered boolean fires, speaking reached when an isAgentSpeaking boolean fires, celebrating reached when a celebrate trigger fires.
Inputs. Inputs are the contract between designer and engineer. Four types ship in Rive 2026: boolean, number, trigger, listener. The designer names them; the engineer wires them. The naming matters — isHovered is clear; state1 is not. The deep dive on input types is in the Rive state machine glossary entry.
The designer exports a .riv file from the Rive editor (File → Export → .riv).
The file-size levers, in rough order of payoff:
| Lever | Typical payoff | Design tradeoff | When to apply |
|---|---|---|---|
| Vector path simplification (Rive editor: Simplify Path) | 20-40% size reduction | Slight loss of curve fidelity at large render sizes | Always — apply on every export |
| Texture-free design (no raster fills) | 50-80% size reduction | Cannot use photo textures or complex bitmap fills | Apply unless brand requires raster textures |
| State-machine deduplication (one SM, many states) | 5-15% size reduction | Slightly more complex state graph in editor | Apply when prototyping with multiple machines |
| Frame rate reduction (60fps → 30fps export) | 10-20% size reduction on long timelines | Subtle motion appears slightly less smooth | Apply on mascots; do not apply on UI motion |
| Symbol reuse (one head used across multiple states) | 15-25% size reduction | Requires upfront design discipline | Apply on character-system designs from day one |
A well-optimized vector mascot typically lands around 80-140KB after these levers. The Rive runtime itself adds another 80-100KB compressed (Rive runtime docs, 2026), bringing the total to 160-240KB.
How do I mount Rive in a React app?
The 2026 default runtime is @rive-app/react-canvas. The runtime renders to an HTMLCanvasElement; React provides the lifecycle.
The minimal mount looks like this — but the minimal mount is not the production mount. The production mount needs five additions: dynamic import (so the runtime is not in the SSR bundle), IntersectionObserver (so it does not load until the mascot is in or near the viewport), prefers-reduced-motion check (so reduced-motion users see the static fallback), visibilitychange pause (so the animation does not run when the tab is backgrounded), and a forwardRef interface (so the parent can drive state-machine inputs imperatively).
The full production wrapper is documented in /tools/nextjs-rive-wrapper — that page generates the wrapper code with the five additions wired in, parameterized for the consumer's .riv file path and state-machine name, and walks through each pattern in detail.
The two settings that matter at the mount layer:
stateMachinesprop. Names the state machine the engineer is driving. The string must match the name the designer assigned in the Rive editor. Hard-code it; do not let it drift.autoplayprop. Set to true for a mascot that should idle on mount; set to false if the engineer wants to gate playback onIntersectionObserverentry.
How do I drive state-machine inputs from React?
The runtime exposes the state machine via the useStateMachineInput hook. Each input is referenced by (riveInstance, stateMachineName, inputName). The hook returns an input object with a value property (booleans and numbers) or a fire method (triggers).

Boolean input — isHovered. The mascot transitions from idle to attentive when the visitor's cursor enters the chat surface. Wire a useEffect that listens for mouseenter / mouseleave on the wrapping element and writes true / false to the input's .value. The Rive runtime handles the transition in the WASM layer; React does not re-render.
Number input — cartItems. The mascot's posture scales with cart size — neutral at 0, attentive at 1-3, excited at 4+. Wire cartItems.value = items.length from the cart-state subscription. The number input drives a blend in the state machine; the visual transition is smooth without the React tree knowing.
Trigger input — celebrate. The mascot plays a one-shot celebration on a successful checkout. Wire celebrate.fire inside the onCheckoutSuccess callback. Triggers fire-and-clear in a single tick; calling .fire twice in rapid succession is debounced by the runtime.
The stateMachine input wiring is the engineer's primary integration point. The literal token here is wrapped in backticks because the MDX parser would otherwise treat the brace as an expression.
How do I handle accessibility and prefers-reduced-motion?
Two checks at mount.
prefers-reduced-motion media query. window.matchMedia('(prefers-reduced-motion: reduce)').matches returns true if the user has the OS-level setting on. The wrapper checks at mount; if true, it renders a static SVG of the mascot's idle frame instead of mounting the Rive runtime. The fallback uses the same brand surface — the agent is still present — but the motion is removed.
ARIA labeling. The mascot canvas needs role="img" and aria-label="..." so screen readers announce the agent's presence. The label should describe the character ("Yokaify, the AI assistant") not the motion. The label does not change between animated and static fallback.
A third check applies on slow connections: navigator.connection?.saveData === true and navigator.connection?.effectiveType === 'slow-2g' should both fall through to the static fallback. The Save-Data header is the accessibility floor for users on metered connections; serving them a 200KB animation file is wrong even if their motion preference is unset.
How do I verify Lighthouse INP after shipping?
The verification step is non-negotiable. Three measurements in a Lighthouse mobile run (Moto G Power profile, slow 4G, after the mascot is mounted and the page has been loaded with cache cleared).
LCP delta. Compare the LCP on the same page with and without the mascot mount. The target is under 50ms increase. If the mascot is on the LCP element's render path, the wrapper is wrong — the mascot should be deferred.
INP delta. Run a click on a button on the same page with and without the mascot mount. The target is under 200ms p75. If INP regresses materially, the most likely cause is a React re-render storm — the engineer is driving Rive inputs through React state in a way that re-renders the tree on every animation frame. Move the input writes into refs.
CLS. Target zero. The mascot must have explicit width and height to prevent layout shift on mount.
The frontend performance reference covers INP debugging in more depth. For the mascot-specific case, the most common fix is useImperativeHandle to expose state-machine inputs as ref methods rather than as React state.
What does this mean for the team?
The Rive workflow in 2026 is reproducible. Designer ships .riv with named inputs and a documented state graph. Engineer mounts via @rive-app/react-canvas inside a next/dynamic({ssr: false}) wrapper with IntersectionObserver, prefers-reduced-motion, visibilitychange, and forwardRef. PM verifies Lighthouse mobile metrics and signs off on the budget.
The patterns are documented across two companion pieces:
- /tools/nextjs-rive-wrapper generates the production wrapper code for a given
.rivfile and state-machine name, with each of the five additions wired in and walked through. - /glossary/rive-state-machine covers the four input types and the state-graph design patterns.
It comes down to three moves: design in Rive, mount with a dynamic import, and verify in Lighthouse. Each phase has a checklist and a companion reference, and skipping any one of them ships code that looks fine in dev and falls apart in production — the most dependable surprise in frontend work.
Further reading
- GuideRive on ecommerce sitesThe companion guide on the strategic and CRO side.
- GuideThe ecommerce performance referenceThe bundle and INP budgets the wrapper has to fit.
- ToolNext.js Rive wrapper generatorGenerates the production wrapper code referenced in this tutorial.
- BlogRive vs Lottie: an honest comparisonWhen Rive is the right runtime and when it is not.
- GlossaryRive state machineThe four input types and the state-graph patterns.
Frequently asked questions
Boolean (on/off), number (continuous), trigger (one-shot fire-and-clear), listener (in-Rive pointer event). Deep dive in the Rive state machine glossary entry.
Last updated June 10, 2026. Runtime: @rive-app/react-canvas (2026). References: Rive runtime docs (2026).